
This is a sponsored post. I received free product in return for creating these craft projects. This post also contains affiliate links. See my disclaimer for more.
Beetlejuice, Beetlejuice, Beetleju— Just kidding! This ghoul isn't trying to summon any bioexorcists to her website today...
I will, however, summon three fun and easy crafting ideas you can make with this killer sandworm gift wrap from Spooky Cat Press!
There are so many gorgeous goodies in this shop that I can’t quite resist grabbing items for DIYs now and again. And lucky for me (and you!), Spooky Cat Press’ gift wrap is always on a 5 for $25 deal with their cards and stickers.
I love their gift wrap because the paper is thicker than what you’d find in a big box store, and there are SO many spooky and seasonal designs to choose from!

But to celebrate the release of “Beetlejuice, Beetlejuice,” I opted for this sandworm design.
Here’s what I made…and how you can make it too!
(Plus where to find two more crafting ideas using this paper.)
How to Make Sandworm Coasters
If you were around last holiday season, you saw the Krampus coasters I made using a couple of greeting cards from Spooky Cat Press. We’re revisiting that idea today, plus two more for picture frames!

Supplies:
1 sheet of sandworm gift wrap from Spooky Cat Press
One-piece wide-mouth Mason jar lids (what I used)
Pencil
Scissors
EasyCast Clear Epoxy (what I used, enough for 8 coasters)
Plastic cups (disposable, 2)
Stir stick (1-2, use something disposable like a popsicle stick)
Scrapbooking adhesive tape
Flat tray (like an old cookie sheet)
Wax paper
Notes: Make sure you search the exact phrase “one-piece wide-mouth Mason jar lids” to find the correct ones. Two-piece lids won’t work for this. You’ll also prefer wide-mouth lids to accommodate glasses better, I promise.

Instructions:
Take one of your Mason jar lids and place it on top of the gift wrap image you want on the coaster. Trace around the edge of the Mason jar lid with your pencil, then cut out the circle. Repeat until you have all your coaster images.
Using the scrapbooking adhesive tape, draw an X on the back of your coaster images, then place face-up in the Mason jar lid. Press into place. The adhesive will help hold them in place and keep the epoxy from getting under the paper. This style of adhesive also works better than glue since it won’t create bumps under the paper.
Place a sheet of wax paper onto your flat tray, then place your prepped Mason jar lids on top. Once you add the epoxy, you’ll want to let these sit on a flat, protected surface for at least 24 hours.
From here, you’ll want to follow the instructions in your epoxy kit. For the brand I recommended, you mix even parts of the two liquids together in a plastic cup and stir with a stir stick for two minutes. Then transfer liquid to a clean plastic cup and mix for another minute. Pour immediately into your Mason jar lids—just enough to coat should be fine (about 1/8-1/4 inch).
Set the tray on a flat surface and allow the epoxy to cure for 24-72 hours. (The longer the better!)
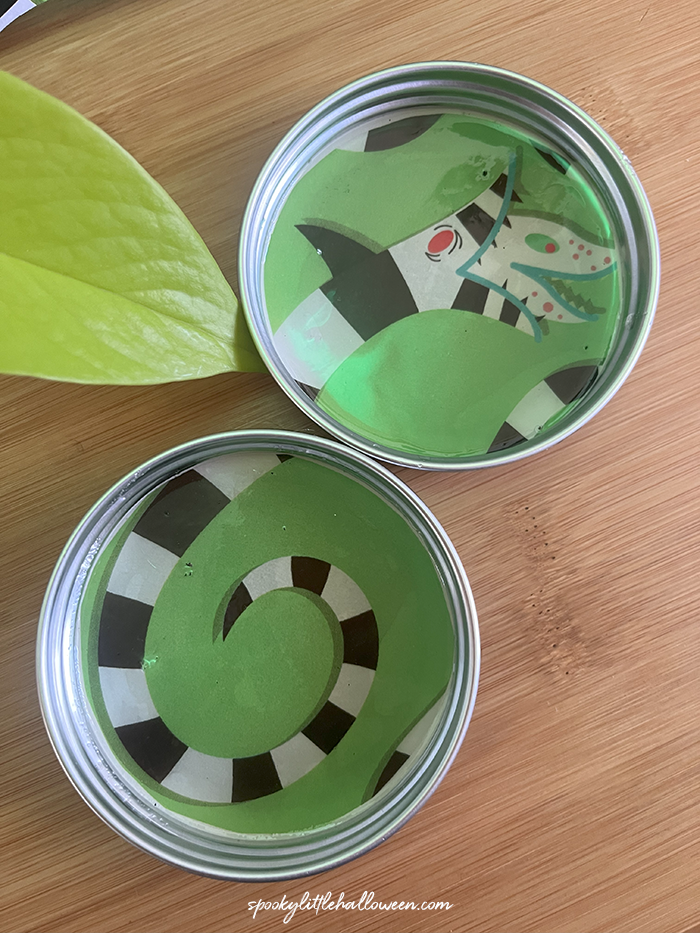
Helpful tips: Since you have to pour quickly with the epoxy mixture, I went back and tilted all my coasters to make sure the paper was fully coated. I also tapped a few of them with bubbles to make those rise to the surface. I had no issues with bubbles being trapped in the final product after it cured.
The epoxy kit I recommended was enough to make 8 coasters. If you want to make more than that, you'll need to buy a larger kit or multiple kits.
The one-piece wide-mouth Mason jar lids come in LOTS of colors, so if black isn't your thing shop around for other color options. I would stick to metal ones for this craft, however.
How to Make a Sandworm Frame
This idea was 100% inspired in the store aisle when I was picking up supplies and saw this frame…most because I knew THE perfect photo for it! Myself and That Halloween Bro at his Tim Burton-themed Boos & Booze party in 2021.

Supplies:
1 sheet of sandworm gift wrap from Spooky Cat Press
Wooden picture frame (any shape/size is fine)
Mod Podge (what I used)
Black acrylic paint (optional, can substitute another color)
Paintbrush
Pencil
Scissors

Instructions:
Place your sandworm gift wrap face down (white side up) on a flat surface. Place the picture frame on top, then trace the inside and outside lines of the picture frame on the gift wrap. Cut out drawn picture frame, including center, and set aside.
Optional: If you wish to cover the wood edge, paint the inside and outside edges of the wooden frame with acrylic paint. I used black, but you can use whatever you have on hand or like. Apply 1-2 coats and allow to dry to the touch before continuing on. Be sure to clean your brush to use again for Mod Podge.
Once the paint is dry, take your paper picture frame cutout and line it up on top of your wooden picture frame. Lift one section at a time and apply Mod Podge to the wooden frame, then smooth the paper down to adhere it. Continue all the way around the frame. Allow 30-60 minutes to dry.
Optional: If desired, paint over the top of the paper with Mod Podge as well. (I did this, but I was using a matte Mod Podge so it didn’t really show.)
Allow to dry completely, then add your favorite Beetlejuice-themed photo and place the frame on a bookshelf or hang on a wall to enjoy!
How to Make Sandworm MATTING
This is kind of a reserve matting, but it’s one I’ve done for several prints and pieces of art on the gallery wall in the Spooky Little Office.
Instead of cutting out a picture frame-style rectangle, I just cut out a rectangle the size of the picture frame to back the photo. It’s so fun and adds a level of interest to the piece that I love.

Supplies:
1 sheet of sandworm gift wrap from Spooky Cat Press
1 picture frame (any size)
1 piece of Beetlejuice-themed art (sized to match frame - mine is from Crypt Kitty Designs)
Pencil
Scissors
Double-stick tape (optional)
Instructions:
Remove backing and any papers from picture frame.
Place your sandworm gift wrap face down (white side up) on a flat surface. Take the glass OR backing from the picture frame and place on the gift wrap. Trace the outline with a pencil, then cut it out.
Optional: place 1-2 pieces of double-stick tape on the back of your art print, then center of the gift wrap. You can skip the tape to avoid damaging the print, but keep an eye on things as you assemble so nothing moves out of place.
To assemble, place your art print and gift wrap face down in the wrap. Insert the frame backing and secure it.
Place the frame on a bookshelf or hang on a wall to enjoy!
More Sandworm Gift Wrap Crafts
Want more quick and easy ideas for this gift wrap from Spooky Cat Press? Over in the Spooky Little Clubhouse on Patreon, you’ll find a magazine holder and serving tray.

Which sandworm gift wrap craft will you make?
I always love taking simple ideas and making them spooky, and this trio of crafts is no exception!
Let me know in the comments which idea is your favorite — or what DIY you’d make using this gorgeous gift wrap from Spooky Cat Press!